

Would Duct Tape Work To Repair A Canopy For A Gazebo
How to Build a Gazebo
Build this airy summer hangout that features fish-scale shingles and decorative trim you brand yourself.
![]() Time
Time
Multiple Days
![]() Complexity
Complexity
Intermediate
![]() Toll
Toll
$501-thousand
Introduction
Likewise gracing the back one thousand with its splendor and calming presence, a gazebo is the perfect place to entertain. One expect at this beauty and yous'll be picturing it filled with family and friends, celebrating a graduation or even a backyard nuptials. Nosotros designed this 12-ft. dia. gazebo with plenty of eyepleasing trim, from the blueprint-cutting rails that environment the seating area to the ball-shaped finial atop the cupola. Nevertheless it'southward like shooting fish in a barrel to build your ain gazebo if you follow our special hints, tips, technical illustrations and Cutting List.
This Gazebo is Builder-Friendly
This how to build a gazebo project is non as difficult as it looks. Retrieve of it as a series of several shorter projects with an end goal in sight for each. You can make all the decorative parts in your garage or store (especially on rainy days).
If y'all take several friends aid yous with the slab and framing (promise them annihilation), you lot tin can spread these ii tasks over several weeks. A project like this would take two experienced carpenters nine working days from first to finish. An intermediate practise-it-yourselfer who has built a deck should plan this as a whole summertime project. Check out these 12 one-hour projects for your summertime saucepan list.
NOTE: You must take a site that slopes less than four inches over 12 ft.; whatever more than this volition require some excavating.
Figuring Out The Slab:
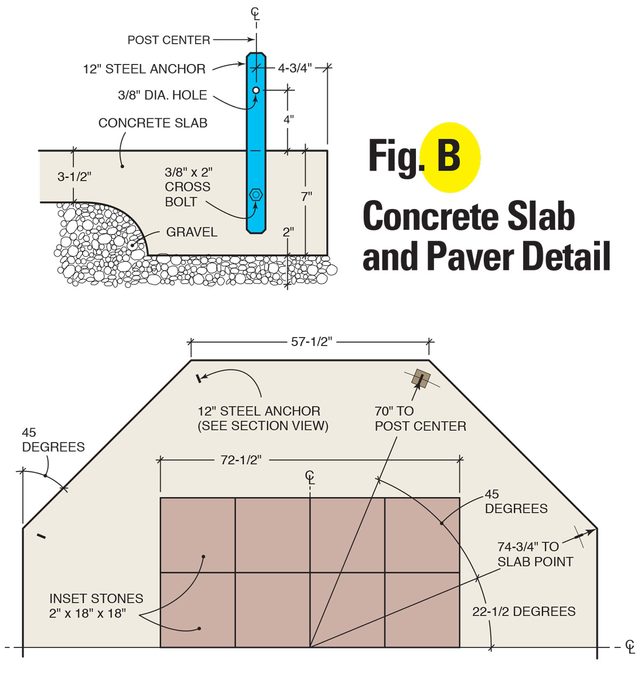
You don't take to become the slab dimensions perfect, only the closer they come to it the easier things will be later. If you hate doing concrete work, skip this section, photocopy it and give information technology to your physical mason. A crew can exercise the work for about $one,200 while you're out shopping for lumber or cutting parts (but you can cutting the price to a couple of hundred if yous do information technology!). Closely follow Fig. B (above and below in "Additional Information") if you decide to pour the physical slab yourself.
Running an Electric Conduit
To build your gazebo, begin by driving a two-foot piece of rigid electrical conduit at the intended center of the gazebo. Bulldoze it in 18 inches. Remove the sod with a rented sod cutter. You'll need to excavate a nine-inch-deep area radiating out about 78 inches from the conduit. After that you'll set forms and put in a layer of 1/4-in. gravel to the dimensions shown in Fig. B. The idea is to have the outside human foot or more of the slab thicker to support the weight of the construction. Here's how to run power anywhere.
Tips for Building Your Forms
Build your forms after carefully examining Fig. B. Set your circular saw at 22-ane/2 degrees and cut eight 2×8 exterior forms with the short side measuring 57-1/2-in. Screw the forms together with three-inch deck screws. Have a friend help you align the forms so the eight corners of the forms are however distance from the conduit center. If these measurements are all equal, your slab volition be a perfect octagon — get it equally close as you can. Drive 3/4-in. x 2-one/ii-in. stakes along the outside of the forms at each intersection, level the forms and screw the forms to the stakes.
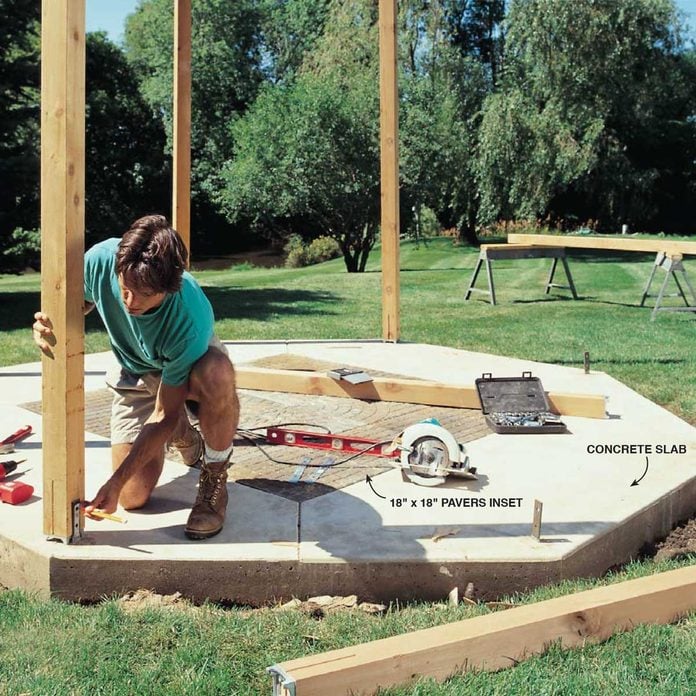
Now build a square inner class for the patio inlay, 72-1/2-in. on each side. Center it every bit shown and bulldoze in the stakes on the inside of the forms and screw them together.
Concrete Slab Requirements
The slab will require about one-1/two-yds. of physical and four 10-ft. pieces of No. four rebar. Have plenty of assistance (at least iii strong backs and two heavy-duty wheelbarrows). Wheelbarrow the concrete and dump it into the forms, lay rebar four inches in forth the perimeter, screed the physical with a direct 2×4, then run the hand float over it. Set your anchors in at the locations shown in Fig. B. Look till the concrete is firm (you should accept to button hard to exit a thumbprint). Shine information technology with a steel trowel, cover it with 4-mm articulate plastic and let it set for two days. Proceed kids and pets away.
Additional Data For this How to Build a Gazebo Projection:
- Effigy A
- Effigy B
- Figure C
- Effigy D
- Figure Due east
- Figure F
- Shopping List
- Cutting List
Project step-by-step (xviii)
Step 1
Cut the Posts to Length
- Bolt posts to the steel strap anchors. Here's how to do it:
- Make the anchors past cut 12-in. lengths of i/8-in. x ane-ane/8 in. steel and wearisome 7/xvi-in. dia. holes into them every bit shown in Fig. B.
- Pro tip: You lot tin can find steel stock next to the threaded rod at your home center.
- For actress grabbing power for your posts, exist sure you lot put a bolt and nut into the base before you push the steel into the physical.
- The six-in. of steel anchor to a higher place the concrete fits into a saw kerf at the base of each mail.
- Cut this kerf with a circular saw.
- Pro tip: The blade won't cut all the style through, so flip the post over to proceed the cut in the other side.
- Make the kerf wide enough then you don't accept to struggle to sideslip it over the steel anchor.
- Before you mark your ballast hole cutting your posts to length and bolt them to the steel strap anchors locations, screw the aluminum post standoff to the base of the post.
- Pro tip: These standoffs go along the post elevated for protection against rot.
- Mark the anchor hole locations as shown in photo, then drill a 1-ane/4-in. hole 1/2-in. deep on each side of the post, followed past a 3/8-in. pigsty all the manner through.
- Pro tip: The one-one/iv-in. hole recesses the bolt head and nut to make room for the piece you'll smash over the post later.
- Grab a buddy to help set the post while y'all push the bolt through the hole and tighten it.
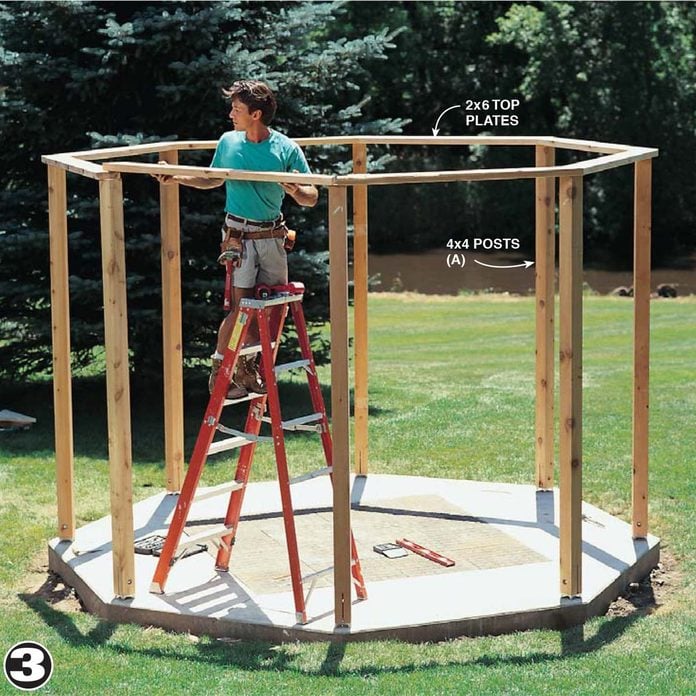
- One time all the posts are in place, cut the 2x6 meridian plates and screw them to the top of the posts with a pair of iii-in. deck screws.
- Plumb this framework with some temporary braces.
Step 2
Tighten the Nut
- Tighten the nut onto the carriage bolt.
- Temporarily brace the 4x4s if necessary.
- Be sure you take the standoff screwed to the posts before you mark and drill the pigsty.

![]()
Footstep 3
Screw the 2x6 Top Plates
- Screw the 2x6 peak plates to the 4x4 posts with 3-in. galvanized screws.
- If your posts are fix properly, the pinnacle plates should all be the same length.
- Brand any adjustments to ensure the posts will all exist plumb.
- Use a level to plumb the posts and install temporary bracing.
- Cutting and install the post wraps C1 and C2 (in the Cutting List, in additional data above) at this time.
Give the Posts Some Dimension:
- Requite the posts some beef and dimension by nailing the cedar wrap to the tops and bottoms.
- Nail the 1x4 (C1 and C2) cedar wrap onto the posts first, then measure out this width and rip-cut the wider 1x6 to fit (D1 and D2).
- Nail the wider wrap to the postal service with 8d galvanized casing nails.
Footstep four
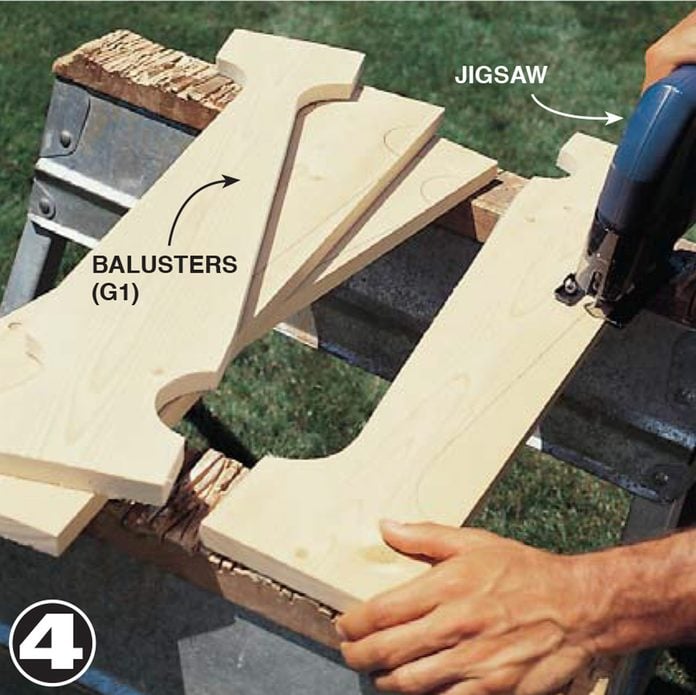
Cut the Balusters
- Cut the balusters and the pickets from 1x6 and 2x6 material. See Fig. C in the attachments higher up.
- Sand, prime and paint the pieces before installing them.
Ready and Cut Out the Gingerbread Pieces
- These ornate parts do take fourth dimension, merely at that place's nothing hard about cutting them.
- Apply the scale drawing in Figs. C and D to make a full-size template and trace the shapes onto boards.
- Pro tip: Don't think you lot accept to cut all of them in one day. This is the kind of job you tin chip away at past knocking off several pieces every day after work.
- Cutting the lower balusters from 1x6 pine and the upper pickets (G2 and G3) from 1x4 pine.
- Use a round saw for finish cuts and a jigsaw for curves.
- In one case you've finished cutting these pieces, sand the edges and prime and paint them.
Step 5
Cut the 16 Corner Brackets
- Cut the 16 corner brackets from 5/iv x ix-ane/4 in. pine (which is ane-1/8-in. thick).
- Pro tip: Note that there are viii left- and eight right-hand pieces.
- Cut the corner braces (J) from v/4 (1-ane/eight in. thick) pino.
- Afterward you cutting the shape, bevel-cutting one side with your circular saw set up at 22-1/2 degrees.
- Pro tip: Keep in mind that there's a left and a right corner brace for each post.
- Prime and paint these as well.
- Boom the corner braces to the post and rail with 8d galvanized casing nails after you install the track, lower balusters, upper pickets and all the cleats.
- Use 4d galvanized casing nails to blast the cleats to the rail.

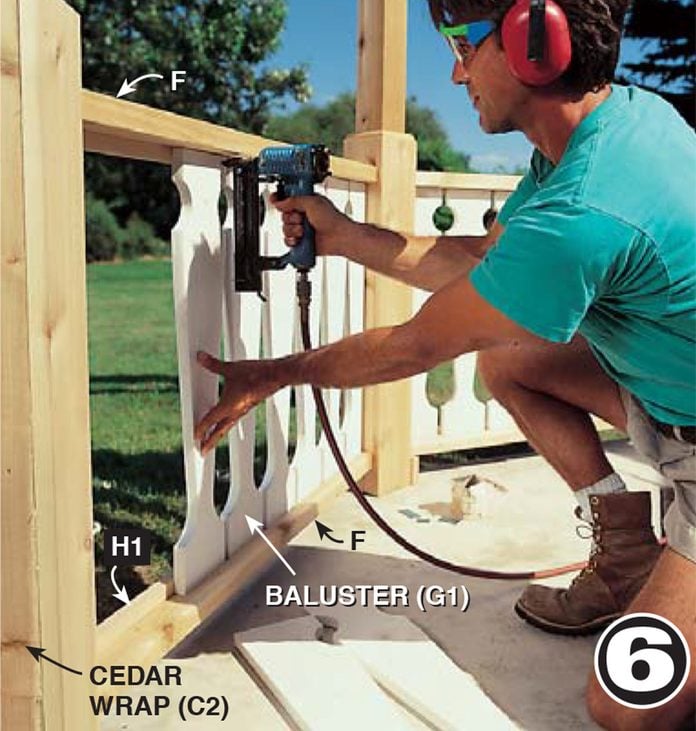
Step vi
Miter and Spiral the Rails and Headers
- Miter and screw the rails and headers to the posts with three-in. galvanized screws.
- Nail the balusters (G1) to the cleats, which are nailed to the cedar rail.
- Use 1-i/4-in. galvanized nails.
- Pro tip: A power stop nailer is handy here.
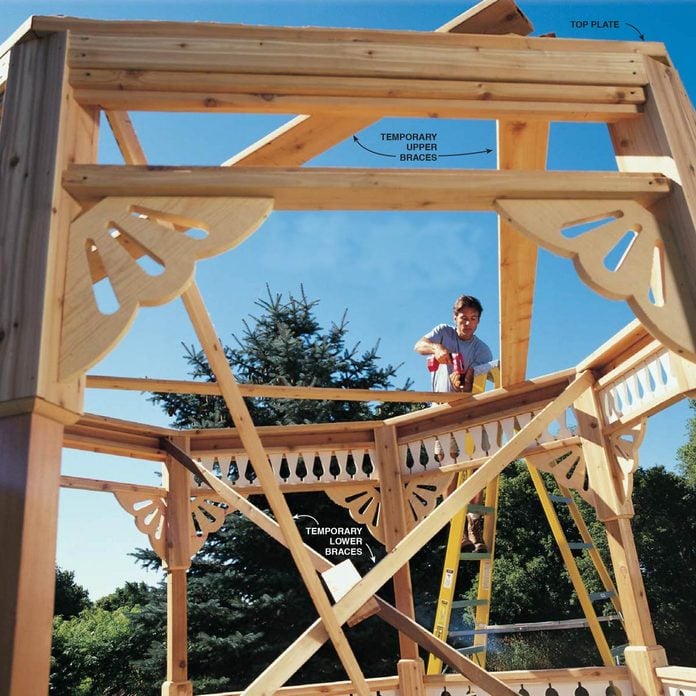
Step vii
Screw Upper Braces
- Screw upper braces to the superlative plates (B). These will help stabilize the structure every bit yous gather the roof.
- Be sure the posts are anchored with braces as well.
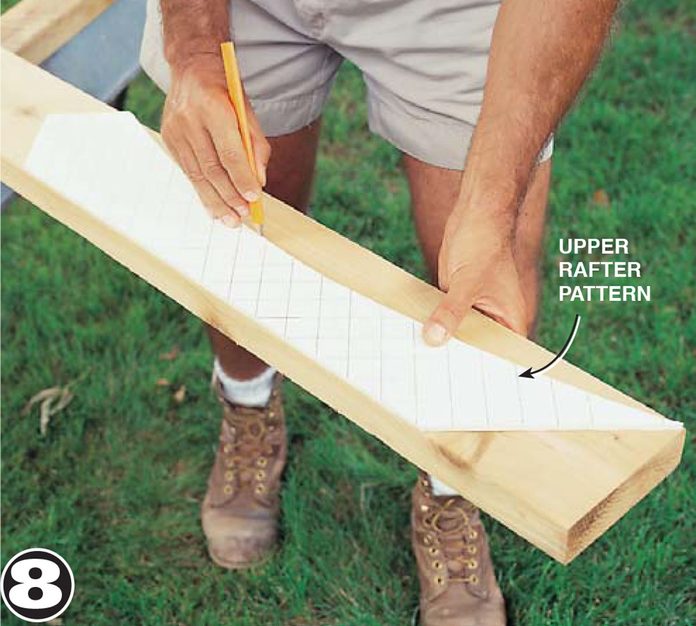
Step viii
Cut the Cupola Rafters
- Cut the rafters and the curved rafter tail buildups using the information in Fig. F.
- Pro tip: Study Figs. A, Due east and F in the attachments at the start of this article.
- Cut your lower rafters (K1) and screw curved rafter tail buildups (K2) to the ends of the lower rafter.
- Cut the 1x2 inner and outer vertical rafter ties (L and P).
- Find that these 2x4 outer vertical rafter ties have slots cut in them to slip over the upper and lower rafters.
- You can cut these slots with a tabular array saw or round saw, working from each end.
- First cut 1 side with multiple passes and then flip the rafter tie over and cut multiple passes from the other side.
- You lot'll get an angled slope at the stop of the slot from the roundness of the bract.
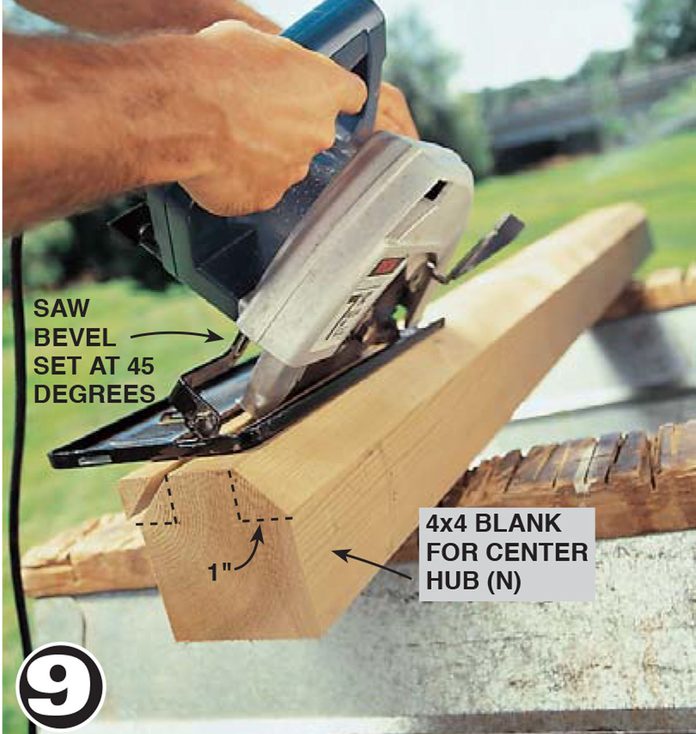
Step 9
Shape the Center Hub
- Shape the center hub (N) into an octagon.
- Measure in from each side about one inch and cut along this line with your saw bevel set at a 45-degree angle.
- The finished octagon should be about one-1/2-in. on a side.
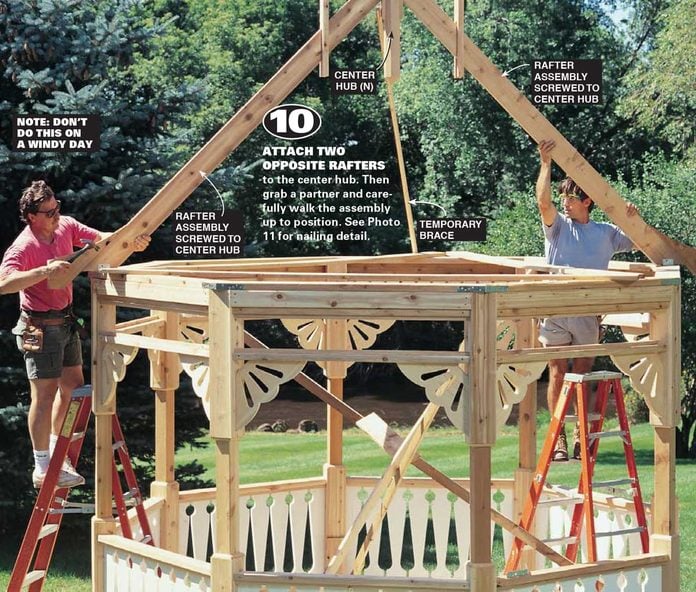
Step 10
Assemble the Rafter Sections Before Hauling them to the Roof
- Lay out the rafter parts (not including the center octagonal piece N) on a large flat area like a garage floor or a driveway (look at the upper left diagram of Fig. A).
- Fasten the upper and lower rafter to the 1x2 (50) with two-in. screws.
- These rafters run parallel, with a 14-1/ii-in. space between them.
- Next screw part P into the sides of the upper and lower rafter so that it'southward parallel to part L.
- Build the residue of the assemblies then mount a pair to the center hub (Due north; see step 9).
- Follow steps ten through 12 to mount the rafter assemblies to the top plates.
Attach Two Opposite Rafters:
- Adhere two contrary rafters to the center hub.
- Then grab a partner and carefully walk the assembly up to position.
Step 11
Nail the Angled Plates
- Nail the angled plates to the rafter and to the top plates to secure the rafters to the structure.

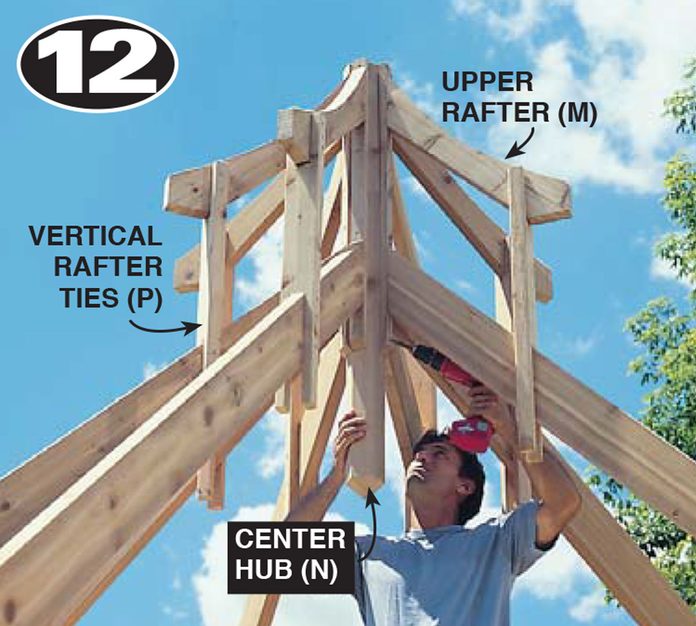
Step 12
Spike Each Rafter System
- Spike each rafter system to the centre octagonal hub.
- Install opposite sides one after the other to maintain the shape of the octagon.
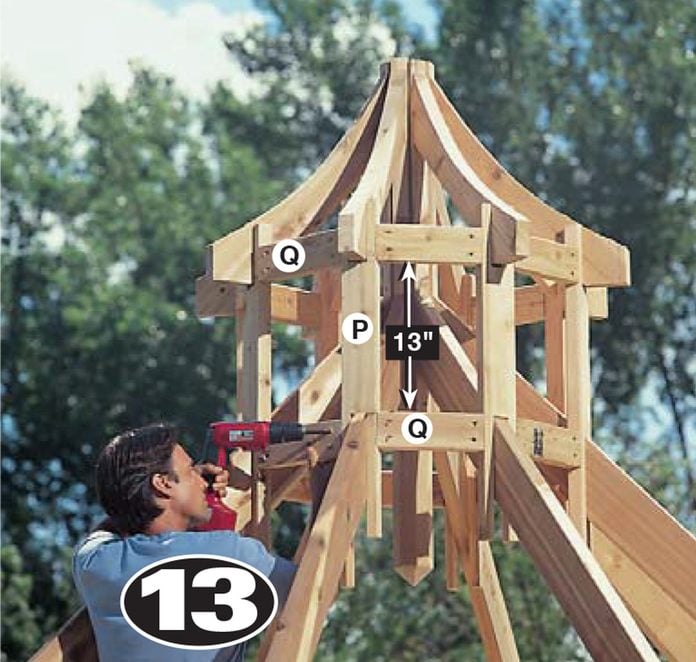
Step 13
Screw the Horizontal Rafter Ties
- Spiral the horizontal rafter ties to the sides of each outer vertical rafter tie.
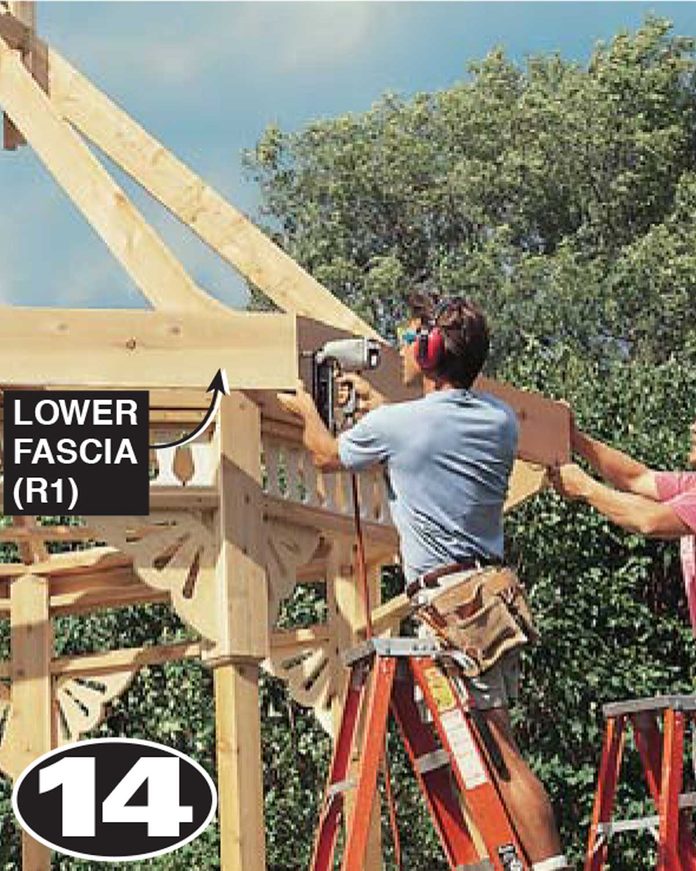
Step 14
Boom the Lower Fascia
- Nail the lower fascia (R1) to the rafter tail ends.
- Miter the ends with the saw set at 22-one/2 degrees.
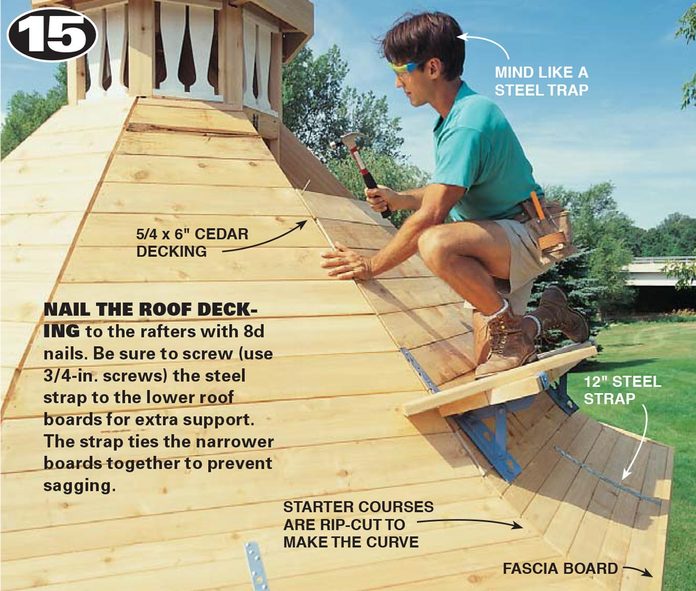
Stride 15
Nail the Roof Decking
- Nail the roof decking to the rafters with 8d nails.
- Be sure to screw (use 3/four-in. screws) the steel strap to the lower roof boards for extra support.
- The strap ties the narrower boards together to foreclose sagging.
- Cut your lower fascia from 1x10 cedar. Concord it vii/viii-in. in a higher place the ends of the rafters then your roof decking will be flush with the fascia.
- Rip 5-1/2-in. decking in half for the first 7 courses so they'll be able to curve around the lower curved section.
- Cut each end of the decking at 22-1/2 degrees for the beginning form and change the angle slightly until you finally accomplish nigh sixteen degrees for the rest of the full-width courses.
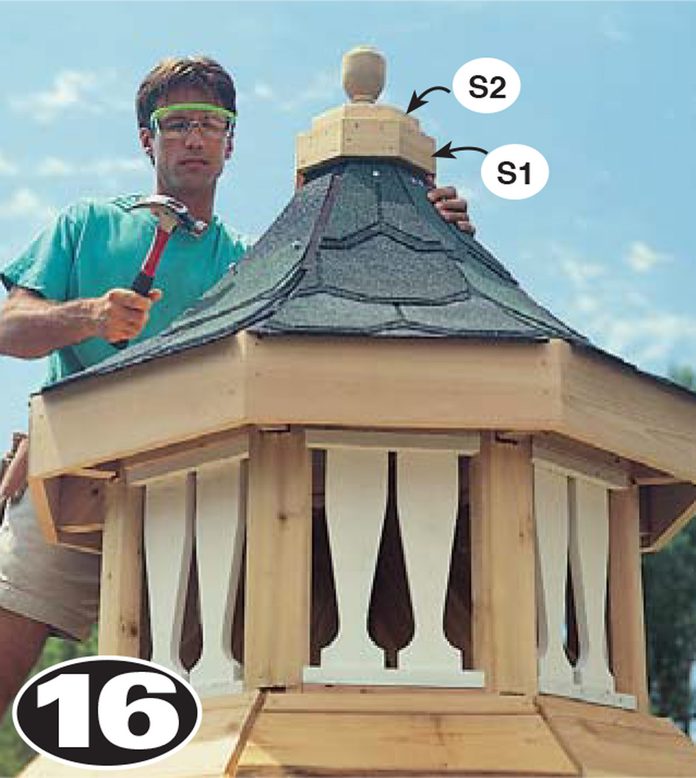
Footstep sixteen
Shingle the Cupola
- Shingle the cupola before shingling the lower roof. Otherwise, you'll harm the lower shingles when you go upwardly and downwards.
- In that location are a few things yous demand to know about using the Carriage Firm Shangle covering cloth.
- First of all, these shingles are heavy, and a bit tougher to piece of work with than ordinary asphalt shingles.
- They also cost virtually twice as much, merely we idea the finished look was well worth it.
- Don't buy the special cap shingles for the ridges; full cap shingles will look out of place.
- Instead, buy a matching color of ordinary asphalt shingles. You can cut these to fit the width and proportion of this minor structure.
- At the cupola where the surfaces are all curved, you'll need to remove the top one-3rd of each shingle to get it to lie apartment.
- The cap over the seams should be cut narrower and shorter to follow the concave curve.
- Another thing to remember for the lower section: The cap shingles should exist full width, merely the length on the lesser four rows of cap needs to be cut downwards several inches to make the curve.
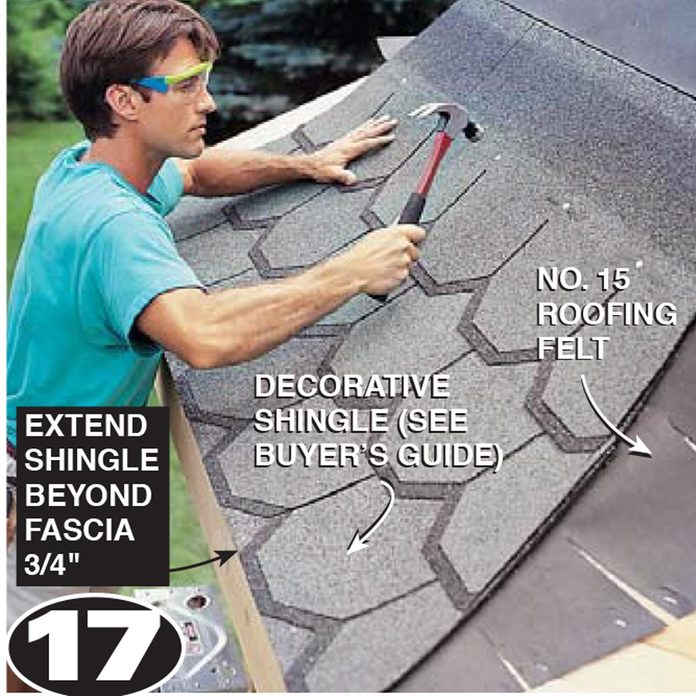
Step 17
Shingle Each Lower Roof Department
- Shingle each lower roof department, then move to the opposite side.
- Keep the exposure consistent from side to side past measuring as you go.
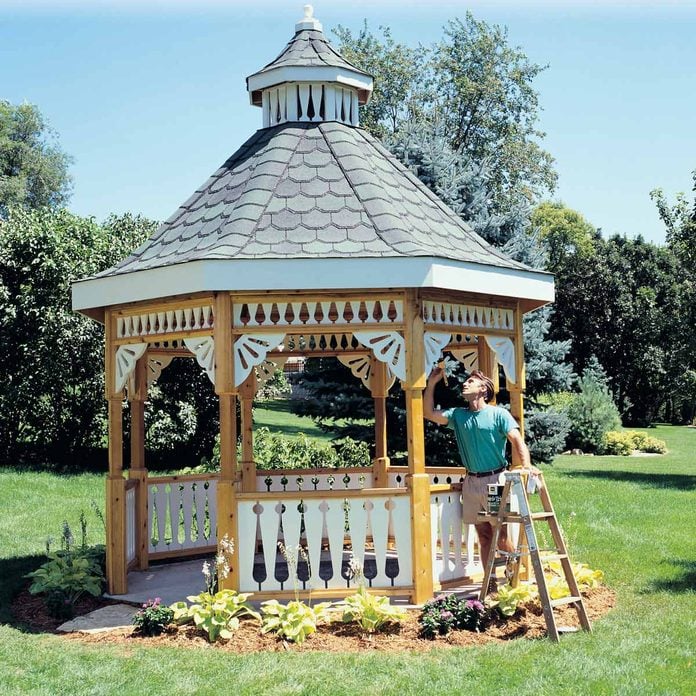
Pace eighteen
Painting Your Gazebo
- In one case yous're done building your gazebo, give it some color!
- Prime and paint if y'all please, only keep in listen that painting the gazebo means a lot of prep and repainting work in the future.
- Information technology'southward best to paint just the gingerbread features equally accents, and then seal the unpainted parts with a brush-on oil sealer.
- We'd recommend applying the oil outset, then painting the side by side twenty-four hours.
- Don't carp oiling the underside of the roof. Because information technology's out of the weather and direct sunday, it'll look fresh for years to come.
Originally Published: June 24, 2022

Source: https://www.familyhandyman.com/project/how-to-build-a-gazebo/
Posted by: garciaestre1969.blogspot.com
0 Response to "Would Duct Tape Work To Repair A Canopy For A Gazebo"
Post a Comment